* I don't have to stir mine, but I don't add any extra peanut oil. I don't know whether adding oil will make it so it separates and has to be stirred.
Ingredients:
1 lb. of roasted, out of the shell peanuts (I recommend low sodium or no salt added out for your first try, then switch later if you want)
Sweetener of choice (optional)
Peanut oil (optional)
The Process:
Pour all your peanuts into a food processor. A blender might work too, but I haven't tried it.
 |
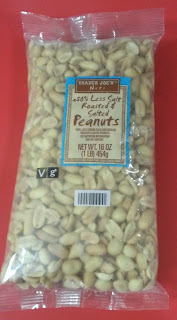
| Believe it or not, Trader Joe's actually had the cheapest peanuts! |
 |
The first time you make this, I suggest waiting until the end of the process to add your sweetener (if you want to use any at all). For your first batch, you will add it in small increments at the end of the process until you reach the desired sweetness, then make a note of how much sweetener you used. The next time you make peanut butter, add your sweetener at the "balling up" stage so it will incorporate as the peanuts are processed.
I put my food processor on medium speed to start, and just let it go for a few minutes. It went through a few stages as it worked. In the first, the peanuts were processed into a flour like state.
Use a spatula to sort of push the peanut flour down off the walls of the processor back down towards the blades. I do this through the food input chute in the lid of my food processor while it runs, since the worst case scenario would be it catches and eats my spatula. If you have to take the lid off to do this, Stop The Processor/blender First! Better to take a couple minutes stopping and starting it to push the food down a few times than to lose a finger!
After a few minutes, your peanuts will start to kinda ball up and look more moist.
If you would like to add a few teaspoons of peanut oil, do so now. I don't, since I use peanut butter mostly for dipping celery sticks and apple slices, but it will make it more spreadable if you want to use it on bread. This is also the stage where you should add your sweetener (if you're using it) once you know how much to use.
Turn the speed up to high, give it a few more minutes, and it will become smooth and actually start to look like peanut butter. It will still need to run a while longer if you want it to be really smooth; it keeps a kinda grainy texture for the first several minutes. If you are making peanut butter for the first time, start slowly adding your sweetener of choice now. Add a little, let it blend, then stop it and taste, and continue until your peanut butter has reached the desired consistency and sweetness.
 |
| I like mine Extra Creamy, so I ran it for another several minutes after this point. |
When you decide it's ready, pour into a container and store it in the fridge. If it seems a little runny at first don't fret; it should thicken up a bit once it's cooled off in the fridge for a bit. It should be good for a few weeks in the fridge, or you can store it in the freezer for several months. The volume decreases somewhere between 1/3 and 1/2 in the process. From a pound of peanuts, I got a perfect pint of finished peanut butter.
 |
| YUM!!! |


No comments:
Post a Comment