Friday, March 29, 2013

Home Made Creamy Peanut Butter

Ok, normally I save the "results" section for the bottom, but I just can't contain myself on this one!  This peanut butter is Fantastic!  It is easy, delicious, healthy, affordable, and unlike those natural peanut butters you buy at the store, you don't have to stir it* for 15 minutes every time you want to have some!  Now that I know how to make my own natural peanut butter, I will never eat store bought again.

* I don't have to stir mine, but I don't add any extra peanut oil.  I don't know whether adding oil will make it so it separates and has to be stirred.

Ingredients:
1 lb. of roasted, out of the shell peanuts (I recommend low sodium or no salt added out for your first try, then switch later if you want)
Sweetener of choice (optional)
Peanut oil (optional)

The Process:

Pour all your peanuts into a food processor.  A blender might work too, but I haven't tried it.
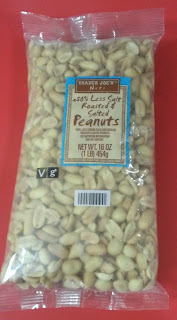
Believe it or not, Trader Joe's actually had the cheapest peanuts!


The first time you make this, I suggest waiting until the end of the process to add your sweetener (if you want to use any at all).  For your first batch, you will add it in small increments at the end of the process until you reach the desired sweetness, then make a note of how much sweetener you used.  The next time you make peanut butter, add your sweetener at the "balling up" stage so it will incorporate as the peanuts are processed.

I put my food processor on medium speed to start, and just let it go for a few minutes.  It went through a few stages as it worked.  In the first, the peanuts were processed into a flour like state.


Use a spatula to sort of push the peanut flour down off the walls of the processor back down towards the blades.  I do this through the food input chute in the lid of my food processor while it runs, since the worst case scenario would be it catches and eats my spatula.  If you have to take the lid off to do this, Stop The Processor/blender First!  Better to take a couple minutes stopping and starting it to push the food down a few times than to lose a finger!

After a few minutes, your peanuts will start to kinda ball up and look more moist.


If you would like to add a few teaspoons of peanut oil, do so now.  I don't, since I use peanut butter mostly for dipping celery sticks and apple slices, but it will make it more spreadable if you want to use it on bread.  This is also the stage where you should add your sweetener (if you're using it) once you know how much to use.

Turn the speed up to high, give it a few more minutes, and it will become smooth and actually start to look like peanut butter.  It will still need to run a while longer if you want it to be really smooth; it keeps a kinda grainy texture for the first several minutes.  If you are making peanut butter for the first time, start slowly adding your sweetener of choice now.  Add a little, let it blend, then stop it and taste, and continue until your peanut butter has reached the desired consistency and sweetness.

I like mine Extra Creamy, so I ran it for another several minutes after this point.

When you decide it's ready, pour into a container and store it in the fridge.  If it seems a little runny at first don't fret; it should thicken up a bit once it's cooled off in the fridge for a bit.  It should be good for a few weeks in the fridge, or you can store it in the freezer for several months.  The volume decreases somewhere between 1/3 and 1/2 in the process.  From a pound of peanuts, I got a perfect pint of finished peanut butter.

YUM!!!

Oh, so how does the cost break down, you ask?  Well, at my local grocery store, a 40 oz. jar of JIF creamy peanut butter is $6.99.  After shopping around, the best priced peanuts (that weren't full of added chemicals) were $3.29 for a 16 oz. bag.  This means that buying peanuts and making peanut butter at home adds an extra 3¢ per ounce, or 48¢ per pound.  Well worth it in my opinion for Delicious, chemical free, no-stir peanut butter!

Tuesday, March 19, 2013

Pot Roast

Ok, I know I haven't posted in a while, but there's a good reason!  Well, there's a reason, but it's actually kind of mediocre.  Between learning how to make our most commonly used cleaning products for cheaper than I could buy them, pulling from our food stores to cut our grocery budget, and finally getting financial aid in and not being quite so poor, I haven't really been trying new tips and tricks to cut our budget because it hasn't come up.  Oh, and I've been ridiculously busy planning my wedding.  That actually takes up most of my time now.  But, I promise to try to get back on the ball, and to kick start this I'm going to share a recipe for an inexpensive meal that can help stretch a budget.  Yeah, I know, everyone has a pot roast recipe and this isn't exactly a post that will grab a lot of attention.  On the bright side, soon I'll be posting gardening tips I try out and review!


Pot Roast

The Ingredients:
Any kind of roast works, but I like using a shoulder roast.  Try to find         something on sale; I shop the "bargain bin" of marked down meats.
Potatoes (I like using red or new potatoes)
Radishes
Carrots
Celery
Lipton Onion Soup mix (or whatever onion soup dry mix packets you like)

The Process:
Wash all the vegetables.
Cut potatoes in half or quarters.
Chop celery in long pieces that will fit flat in the bottom of your crock pot
Cut roots and stems/leaves off radishes
Peel carrots and chop ends off.  Depending on thickness and length of your carrots, you may want to cut them in half.  I like using the really fat carrots that have turned a little woody in the center that wouldn't have tasted as good raw, because slow cooking them around a roast softens them and they still impart a great flavor.

You can brown your meat first or not, I don't think it really makes much difference.  If you want to brown it, just sprinkle a little salt and pepper on it and cook it for a minute or so on each side in a pan on the stove top on medium to medium high heat.  If you're trying to "fast" cook this roast (in the crock pot on high for 4-6 hours), I suggest taking the time to brown it, but if you're "slow" cooking it (in the crock pot on low for 10-12 hours) I think this is unnecessary.

Place celery in bottom of crock pot.
Place roast on top of celery.
Fill in gap around roast with radishes, potatoes, and carrots.
Mix 1/2 to 3/4 cup water with soup mix and pour over roast and veggies.  If needed, use up to 1/4 cup more water to rinse cup and get last of soup mix seasoning/bits into crock pot.

Cover and cook on Low for 10-12 hours, or on high for 4-6 hours.  Your roast is done when you can stick a fork in it and turn it fairly easily and the meat just sort of shreds and yields.

Pull the roast out and let it REST on a cutting board or platter for 10-15 minutes.  This is the Most Important Step!!!  If you cut meat while it is hot, it will loose all of its juices.  If you want a tender and juicy roast, you have to let it cool a little bit so that the proteins can relax.  Here's a great article explaining resting meat.  They talk about steaks, but it really applies to all beef.

After 10-15 minutes, dig in!